Also meeting us there was Joyce's sister Nellie, her son Lendel, and husband David.
 Jacob admiring the shark's teeth.
 Jake, Britton and Emily looking at a gigantic eel. And then we were off to lunch..........all 17 of us!Also meeting us there was Joyce's sister Nellie, her son Lendel, and husband David.Jacob admiring the shark's teeth.Jake, Britton and Emily looking at a gigantic eel. And then we were off to lunch..........all 17 of us!
 On Friday Ru and I took all my grandchildren to the Tulsa Aquarium for a day of fun. From left to right: Jacob, Meleah, Emma, Cody, Dillon, Alana, and Mason.
 This was the first page I painted in this journal. Now it's all ready for writing, stamping, drawing and/or added papers, text or embellishments.
 Here's another of Emma's pages. I love the bright orange and the darker mist she used over the butterflies. Can't wait to see what she does with this page!
 This is my granddaughter Emma. She is always working in some kind of journal.......which just warms my heart! I have always been writing in at least one journal, if not two or three. I have gone crazy over art journaling. I'm very new to this, but wanted to introduce Emma to this wonderful medium, too. We spent all day Saturday a few weeks ago using watercolors to paint pages in a spiral-bound pad of watercolor paper. It was such great fun and she was so creative and inspiring to her Nana. ")
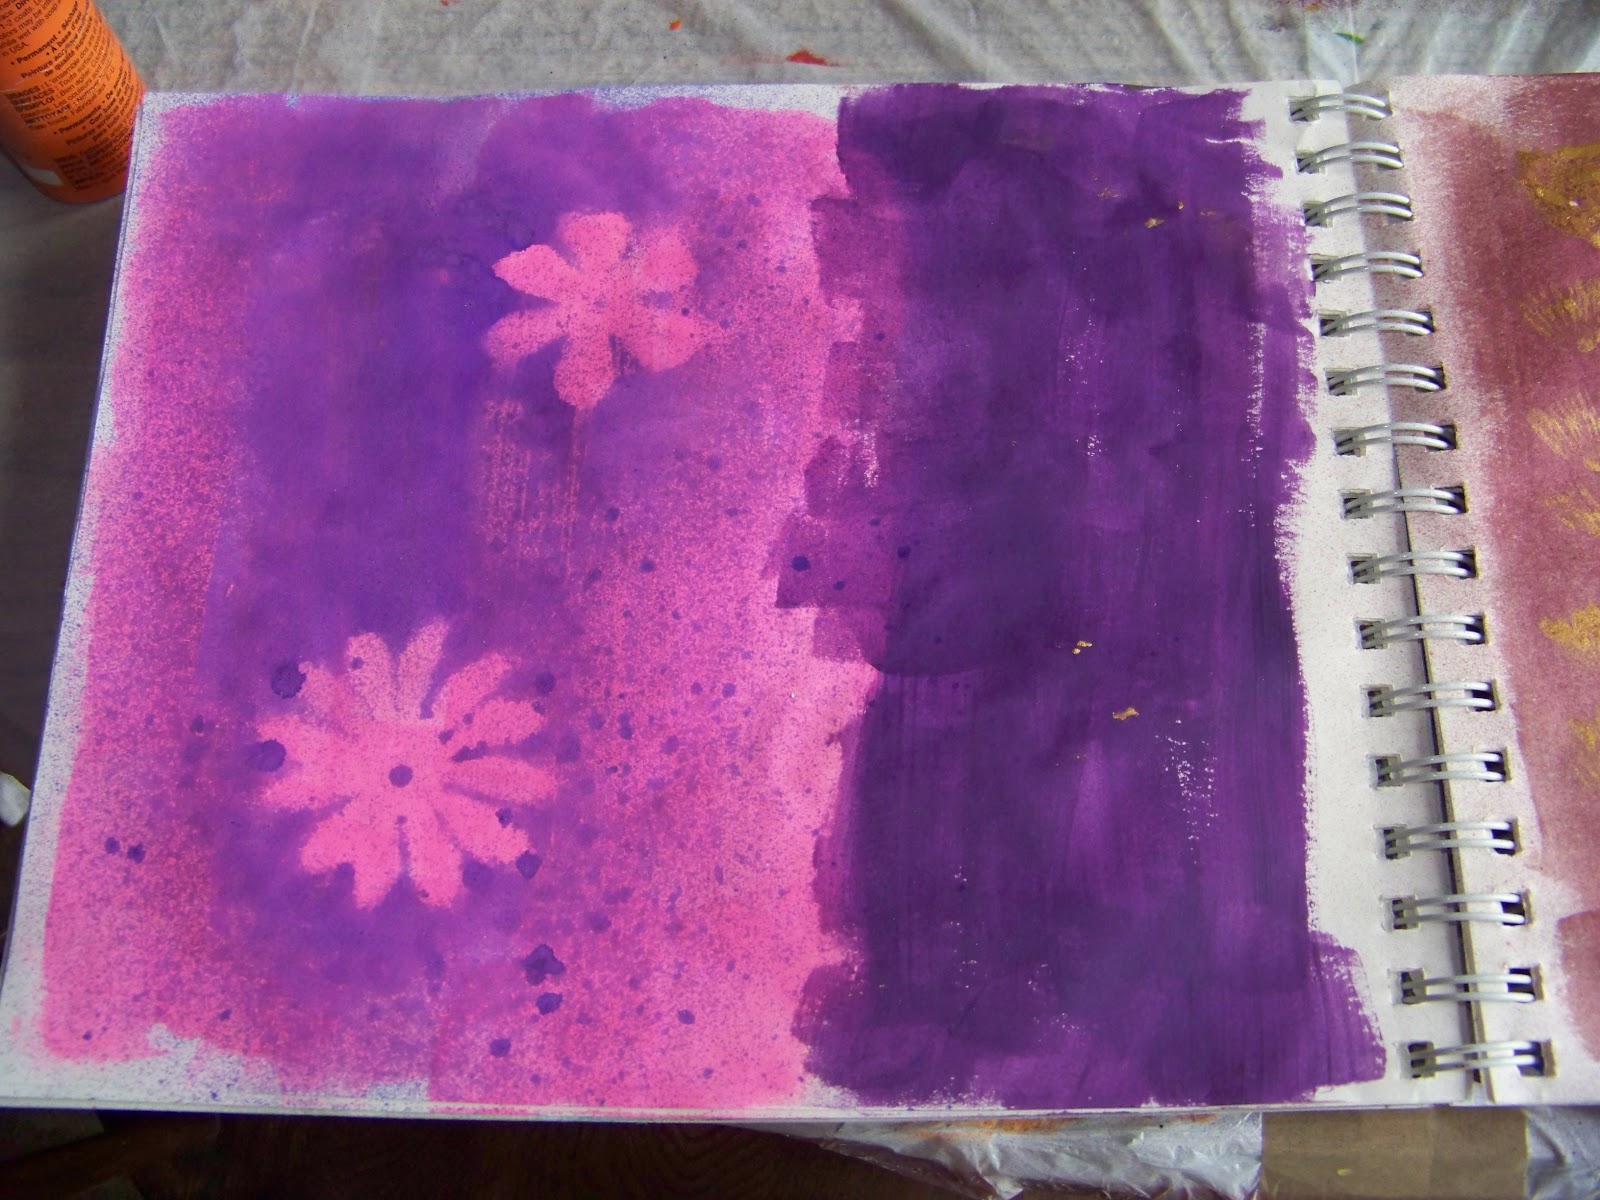 This time we used a spiral-bound pad of sketching paper. We glued three pages together and then tore out the next three pages and continued throughout the pad in this way. Here is one of the pages Emma painted. We were using acrylic paints, glimmer mists and stencils. We painted pages for nearly eight hours! It was so amazing to get lost in the process that we just lost track of time. We finally stopped and drove into town to pick up some supper. Emma stayed the night with us and we just enjoyed her so much.
 Rachel bought us some Who-style headbands to wear! Here you see JP and Ru modeling theirs. (Doesn't Ru make you think of Cindy Lou Who?!! LOL)
 Reluctantly, the girls lined up for me to take a photograph of them with their darling head gear. Ru has the droopy candy cane with mistletoe on the end, Rachel has the lady antlers with tiny red bows, and Sharla has the striped hat with a twisty end topped off with the white pompom. Merry Christmas!
 Here's most of our grandchildren. Ru and JP were not able to have his girls due to sickness. We really missed those little sprites! Seated here are Jacob (celebrating his 6th birthday Dec. 26th), Cody (11yrs), Mason (8yrs), Emma (13yrs), and Dillon (15yrs). Cody and Dillon are brothers and the other three are siblings. We had our Christmas with all the grandchildren on Sunday as they all had to go to their dad's house for Christmas.
 My Mail Art for Minori had to be something sturdy enough to endure international mailing. I chose to do a Christmas "CD" for her. I know it was a November swap, but she loves Christmas and I just had to choose that theme for her. I started with blank paper and used my Glimmer Mist Candy Apple to cover it. I then tore a strip of music paper and glued it across the CD. I cut out an angel and added the red wings and tucked her inside the music paper. Next I added the "tree" at the left: I tore a strip of brown paper for the trunk and green strips for the tiers and then added the red rhinestones and bow at the top. I used a file label to add the sentiment: "Joyeux Noel!" I added the "believe" sticker at the top and a thin layer of cotton and at the bottom and stamped two little red birds, cut them out and added them to the snow. The address label was added to the spine of the CD holder.
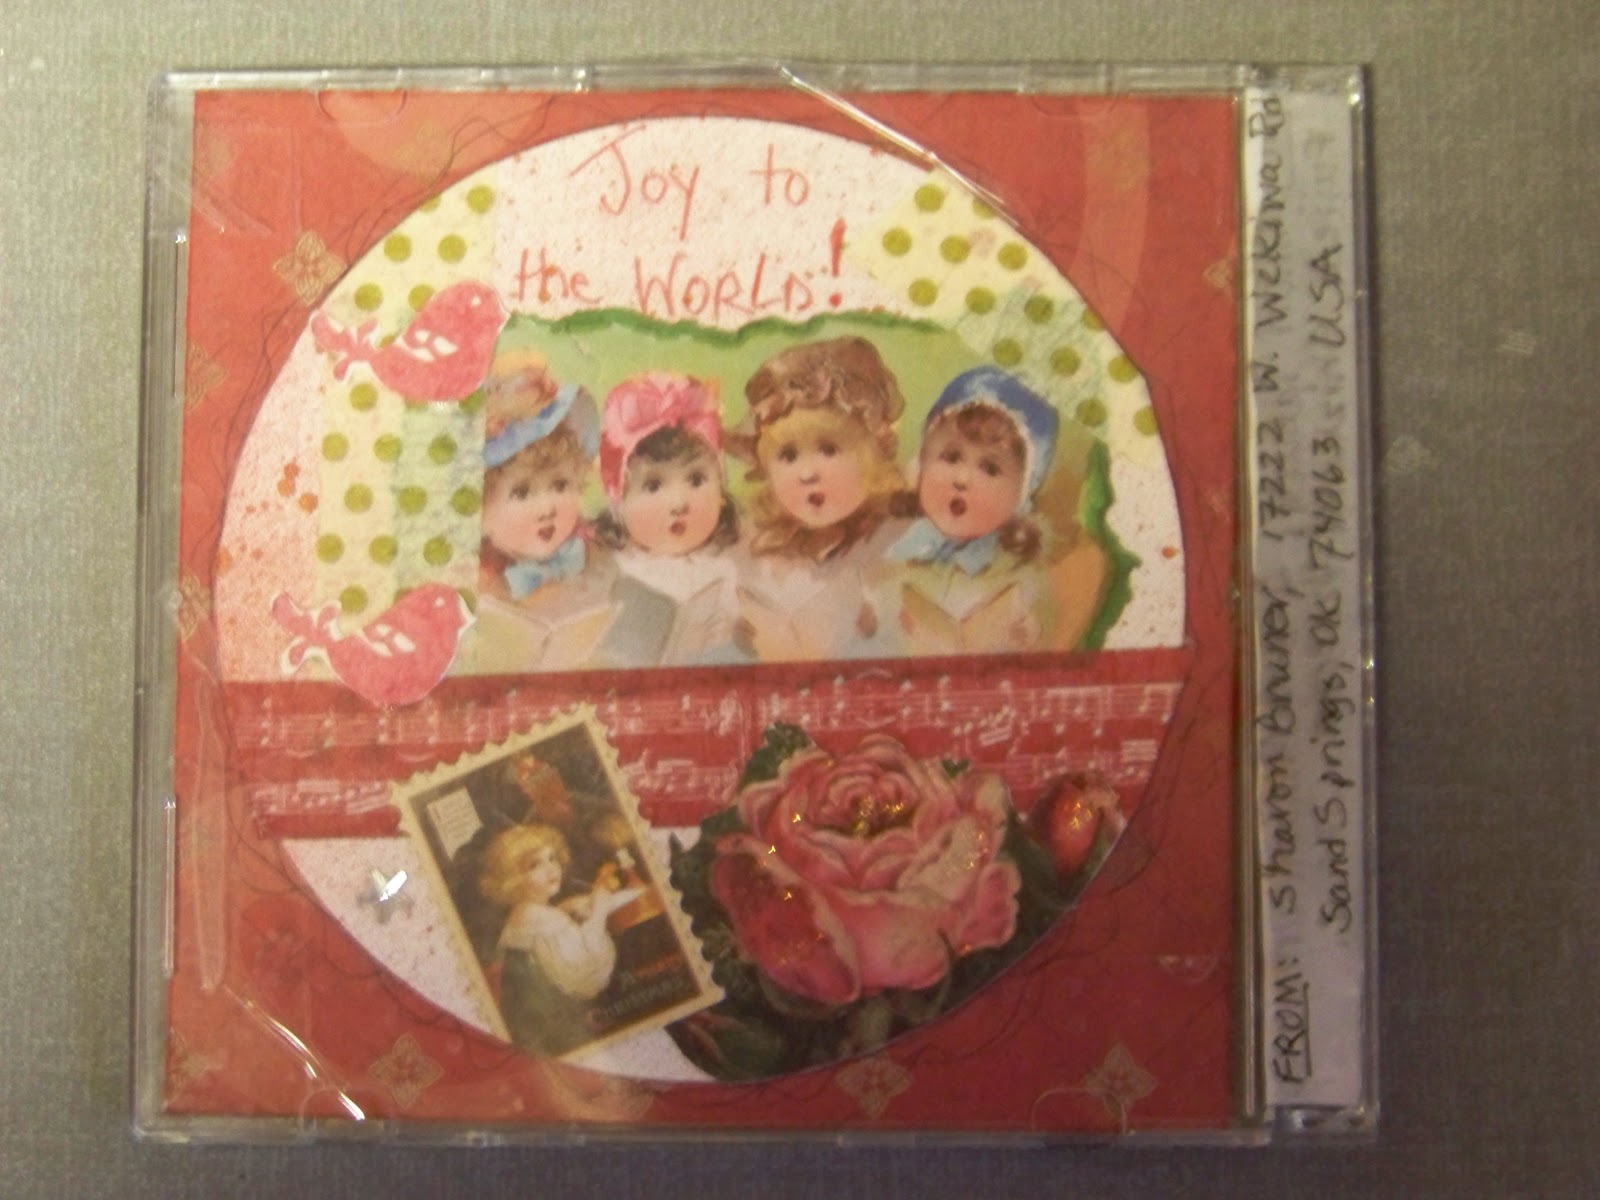 For the back I added the two-sided paper from 7gypsies......red for the back and green to show through to the front. I again spritzed blank paper with Glimmer Mist Candy Apple and placed a musical score made with washi tape strips across the circle. Next I placed strips of green polka dot washi tape on the right side of the circle. Then I tore the picture of the little girls singing Christmas carols from a postcard and placed it above the musical score and over the polka dot washi tape. Then I added more polka dot washi tape to the left side of the circle. I stamped two red birds, cut them out and added them to the left side of the circle. Next I cut out the pink rose and added it to the bottom of the CD and added a faux postage of the little girl writing a letter to Santa over the rose and musical score. Finally I added the rhinestone star beside the faux postage.
 This is such an awesome charm! Love this birdhouse from my friend Jan White. Also love that she used lots of turquoise on it! (my favorite color!:). The top of the birdhouse is also turquoise with a musical score across it and then little music notes on the turquoise tab. And, look! Turquoise rhinestones on front of the birdhouse. ") Thank you, Jan.
 This sweet cameo is from my friend Susan Wilken. What a gorgeouse cameo! I love those little cherubs. Such a nice frame around them, too. Susan has added tiny rhinestones to some of the flowers around the frame. And, last but not least, she has added a beautiful blue bead at the top of th charm. Thank you, Susan. So it seems the theme of my necklace has been blue and birds. I am so happy with it! Thank you, thank you to all my friends who added their awesome creations to this necklace. What a grand round robin!
 The flower jewelry charm is from my friend Marsha Hinds. It is a 3 dimensional piece. She titled it "Stained Glass Window" and that is so appropriate! It really has the look of stained glass. I think it must be two colors of clay rolled together because there are contrasting streaks thoughout the piece.....just like stained glass! She has painted the flower a vivid pink and there is a crease in each leaf painted like a black/white border. Thank you, Marsha! The next charm is from my friend Barb Wenkel. Barb used ultra thick embossing powders (UTE) to make an original piece. While the powders were still hot, she impressed a swirl stamp into it. Then she added some gold to the piece and added the blue rhinestone in the corner. On the back there are gold swirls. Thank you, Barb!
 This charm was made by my dear friend Judi (who got me into rubberstamping!:). I love the frame around this beautiful vintage lady. The tiny amber beads at the top and along the bottom are so sweet! Thank you, Judi!
 My necklace has returned home and it is beautiful. I will be posting each charm and telling who it is from. This has really been a learning experience and I have loved it! I just feel sorry for the first person who received a charm from me. LOL Of course, everyone is saying that they got better as the round robin advanced. I thought I would wear this necklace, but it is so heavy! It seems impossible that nearly a year has gone by while we were sending these necklaces around. But isn't that they way with time? ")
 I painted grunge paper with purple glaze and turquoise paint. I laid a mask down to cover the area for Pat's address and divided the postcard into three sections and used rubber stamps of different font styles for the words on the front. Then I used a ruler and a Sharpie to draw in the lines and dots.
 On the back of the postcard, I used various rubber stamps of ladies and girls. I used Copic markers and colored pencils to color in the images. The paper in the middle of the postcard already had "HAPPINESS" printed on it. I added the stamped flowers. I also added the lines, dots and dashes in the blank areas. I'm glad to say it arrived safely in the UK. :)
 Our art club had a round robin this year for necklace charms. As soon as I can remember who I made this for, I'll come back and edit this post and fill you in! (**) am I old or what?! Thank you, Sara, for reminding me that this was made for you!
 Whoops! should have rotated this one. :) Patience, everyone, it's been a while since I've had a computer. LOL .....when we were in Paris we dug around in a box at one of the flea markets and fished out some interesting brass charms.
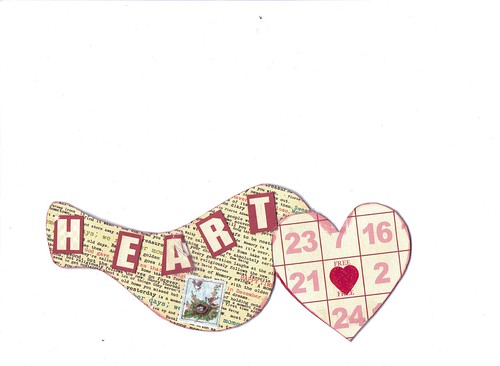
 On the back of the bird, I used a text paper and cut out the letters 'H E A R T" to put across the top of the bird. I cut a heart from a Bingo card (Sara and I both love to use Bingo cards in our artwork). I punched a tiny heart to use in the "free" space. Then I added a faux postage sticker to add to the bottom of the bird.
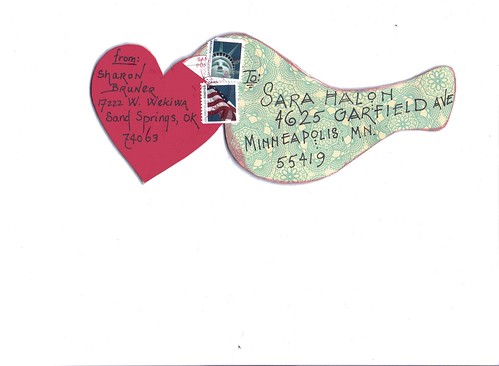
This is the Mail Art that I created to send to Sara in February for art club. I really didn't want to make a valentine, but wanted to include a heart. So I drew this bird with a heart in his mouth and covered him with decorative paper. I used the front for the addresses and stamps. I used half of a postal cancellation stamp for the beak.

 This is the charm that I made for Susan's necklace. I started with a round blank and attached the green resin flower to it. On the bottom ring of the blank, I added a large jump ring to which I added a puffy metal heart and three chains. On the end of each chain I added little nuggets of jade.
 Our Round Robin Project for our art club this year is making charms to go on a necklace. Each member acquired/made the necklace of their choice and then made their first charm. I used a heart bezel, cut out a ballerina laid her in the bottom the the bezel and added the aqua flower to the upper left of the heart and a fleur-de-lis at the bottom. I added an aqua rhinestone to a large fleur-de-lis and hung the two together in the center of my chain necklace. (I don't know why I didn't photograph it on the chain....probably was in a hurry to get it mailed out.)
As I cleaned up my art table, I found the rhinestone fleur-de-lis that I had bought for the finishing touch to Abby's gift. So I unwrapped the canvas again, added the rhinestones, re-wrapped the canvas and tied the ribbon around it. It has now been delivered!
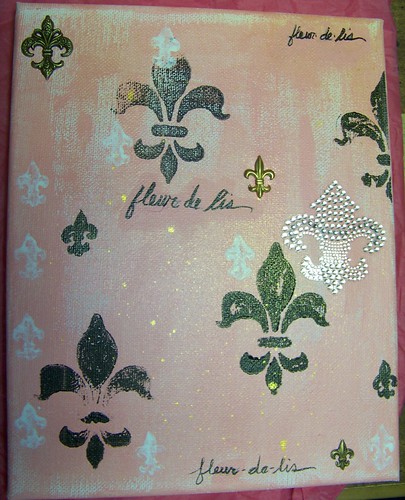
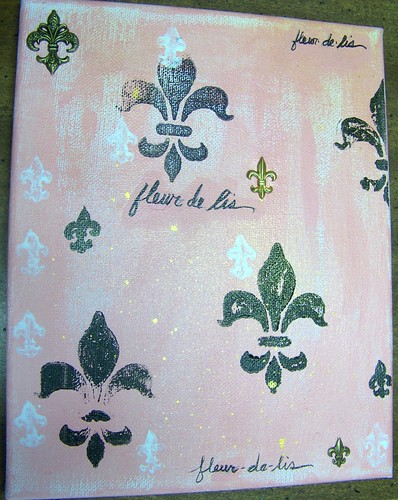
 When I first visited a friend's new house, I found that her young daughter and I shared a fettish for France's fleur-de-lis. We also love the color combo of pink/black/white with just a touch of gold when appropriate. ") So I set out to paint a canvas for her birthday. Well, I have missed the mark by a month but am finally finished with the canvas. I painted an 8"X10" canvas with Studio's "painterly pink", dry-brushing most of the color onto the canvas. I then used Studio's "charcoal black" paint on my fleur-de-lis stamp. I stamped this image 4X, once half off the canvas. Finally I used Apple Barrel's acrylic white paint on my small fleur-de-lis stamp and stamped several X randomly on the canvas. As an afterthought, I used a small brush pen to draw two black fleur-de-lis on the canvas.
 I wrote on the canvas with the small brush pen and as I was about to upload it to my blog, I noticed that I had misspelled "fleur". I had spelled it "fluer". I could not believe I had even wrapped it and was ready to take it to Abby. So I had to unwrap the gift and have a "do-over". ")
 I love these white irises trimmed in purple. They just seem to light up my iris bed. The stalks have been extra long this year sporting 5-6 blooms. They have made wonderful bouquets in my vases.
 This delicate pink iris has tiny pink flecks in the falls. They are hard to see in this photo, but if I enlarged it, the photo actually became very blurry. I think they are such a great addition to an iris bouquet.
 This little beauty is such a striking bloom. I think the light lavendar tops really set of the darker lavendar falls. Stunning, isn't it? ")
 The paper on the right side of this ATC has been done with the DPT approach (Direct to Paper). Just take the inkpad and put it directly onto the paper and swipe, smear, or pat it on. I used several shades of plum for this piece done on glossy cardstock. When dry, cut it up to use on cards, journals or ATCs. ") I tore a piece of decorative cardstock that had row after row of the fluer-de-lis. I edged around the narrow piece with a brown inkpad and then attached it to the glossy cardstock ATC. Next I stamped the birdhouse using a black inkpad. I stamped the three birds with turquoise onto a beige scrap of paper and cut them out. I attached the top and bottom bird with dimensional tape and glued the remaining bird directly to the ATC. I stamped the egg with a varigated pigment ink on glossy cardstock and used the heat gun to dry it quickly. I cut it out and attached it in the lower right corner and attached the "Par Avion" across the egg. I cut out the Paris faux postage and attached it to the top of the ATC. (This was traded in a personal trade.)
 I love this striped paper! It is the reverse side of one of the papers in graphic45's Curtain Call collection. I thought it perfect to use this wine cap. The colorful paper is light weight watercolor paper that I used to try out some new watercolors. I tore off a piece of it and stamped the pear image onto it with a black inkpad. I attached the watercolor paper onto the bottom half of the ATC and attached the flattened wine cap
 I wanted to do a card with "windows" and decided to use my 1" round paper punch on this ATC. I love these little flower fairies and know the recipient does too, so I punched one window to show her face and another to show the flowers at the end of the bouquet she was carrying. My friend lives in the North and we had been emailing about longing for Spring, thus the sentiment
 This is the ATC I made for our art club swap in January. I used a clothing tag as my base. I cut out the starburst that was in the center of the circle on the tag. I chose this face from graphic45's Curtain Call collection to show through the opening. The little tag at the top left of the circle is from 7gypsies. I edged it with red ink and attached it to the tag with red eyelets. The image on the little tag is from a photo I took in the Metro in Paris this past Sept. I used a thumb nail print and cut it in half to attach it to the tag. Next I placed the flower next to the circle and attached it with a rhinestone brad. I used Cavallini's number tape to go down the side od the tag and added "Cirque" to the name on the tag. (This tag went to my dear friend Sara.)
 This tag has images from one of Sandy Gordon's art sheets that can be purchased and downloaded from her web site. I love these strolling ladies and imagined they were from MA's era. I placed a Paris postmark in front of the leading stroller and then attached the second lady in the foreground to add dimension to the ATC. I entitled this one "Strolling through Paris". (This one went to Jean, a dear lady that I have been trading with for years...........we met online in one of her ATC trades.)
 This is my ATC for a personal trade that I have done for years with a very close and dear friend, Judi. It was February and time for a little Valentine. ") I used the image of the little girl from the stamp collection "Polaroid Cutie". I cut around the image in a heart shape. I placed a strip of watercolor paper that I had used some metalic paints on along the left edge of the ATC and a piece of script paper on the right side. I attached the heart to the ATC and added the XO sticker in the upper right corner. I took apart a heart earring and added the open metalwork heart next the the image. Next I outlined a ticket with a red marker and cut a rectangle from the center so I could put a word ticket behine the slit. I mounted the tickets together with dimensional tape. I added red rhinestones to the ticket and attached it to the bottom of the ATC as shown. Next I stamped a small red heart in the bottom right corner. Finally I added some clear rhinestones to the ATC.
 Some times the scrapbooking paper might even have a hidden image in it like the horse on the dark pink ard on the left. Even a piece of film strip and a puzzle piece make good embellishments on them.
 These cards are gifts for the ladies that I meet with every Tuesday morning for Bible study. It's a surprise, so don't tell! ")