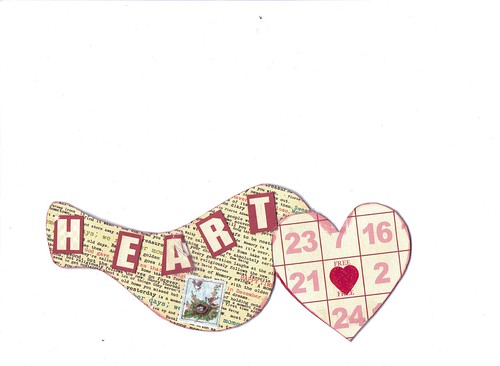
On the back of the bird, I used a text paper and cut out the letters 'H E A R T" to put across the top of the bird. I cut a heart from a Bingo card (Sara and I both love to use Bingo cards in our artwork). I punched a tiny heart to use in the "free" space. Then I added a faux postage sticker to add to the bottom of the bird.
Saturday, April 28, 2012
Mail Art for Sara
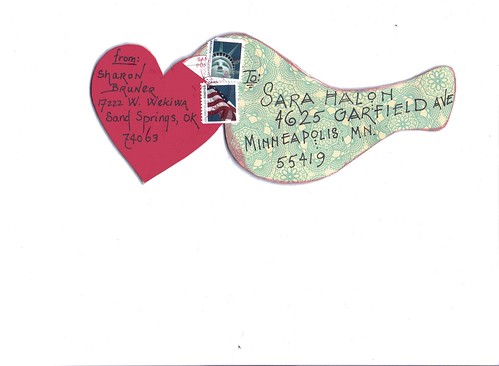
This is the Mail Art that I created to send to Sara in February for art club. I really didn't want to make a valentine, but wanted to include a heart. So I drew this bird with a heart in his mouth and covered him with decorative paper. I used the front for the addresses and stamps. I used half of a postal cancellation stamp for the beak.
Monday, April 23, 2012
A Charm for Pat

A Charm for Susan
 This is the charm that I made for Susan's necklace. I started with a round blank and attached the green resin flower to it. On the bottom ring of the blank, I added a large jump ring to which I added a puffy metal heart and three chains. On the end of each chain I added little nuggets of jade.
Necklace round robin
 Our Round Robin Project for our art club this year is making charms to go on a necklace. Each member acquired/made the necklace of their choice and then made their first charm. I used a heart bezel, cut out a ballerina laid her in the bottom the the bezel and added the aqua flower to the upper left of the heart and a fleur-de-lis at the bottom. I added an aqua rhinestone to a large fleur-de-lis and hung the two together in the center of my chain necklace. (I don't know why I didn't photograph it on the chain....probably was in a hurry to get it mailed out.)
The FINAL....really.......Fleur-de-lis Canvas
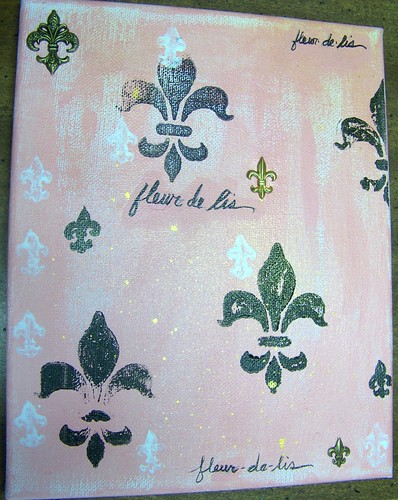
As I cleaned up my art table, I found the rhinestone fleur-de-lis that I had bought for the finishing touch to Abby's gift. So I unwrapped the canvas again, added the rhinestones, re-wrapped the canvas and tied the ribbon around it. It has now been delivered!
Friday, April 20, 2012
Final Fleur-de-lis Canvas
This is the final piece. I corrected the spelling error and spritzed some of Glimmer Mist gold across it. I dry brushed pink all around the edges (sides) of the canvas, signed it and wrapped it again for Abby!
Fleur-de-lis Canvas
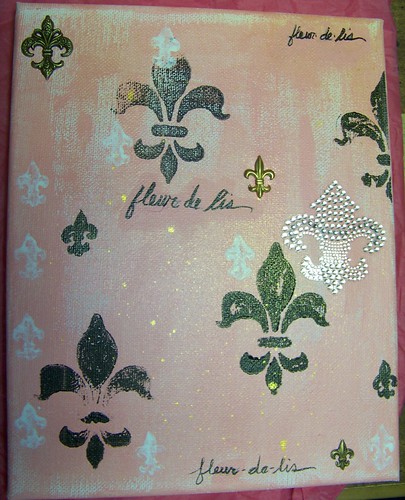
 When I first visited a friend's new house, I found that her young daughter and I shared a fettish for France's fleur-de-lis. We also love the color combo of pink/black/white with just a touch of gold when appropriate. ") So I set out to paint a canvas for her birthday. Well, I have missed the mark by a month but am finally finished with the canvas. I painted an 8"X10" canvas with Studio's "painterly pink", dry-brushing most of the color onto the canvas. I then used Studio's "charcoal black" paint on my fleur-de-lis stamp. I stamped this image 4X, once half off the canvas. Finally I used Apple Barrel's acrylic white paint on my small fleur-de-lis stamp and stamped several X randomly on the canvas. As an afterthought, I used a small brush pen to draw two black fleur-de-lis on the canvas.
 I wrote on the canvas with the small brush pen and as I was about to upload it to my blog, I noticed that I had misspelled "fleur". I had spelled it "fluer". I could not believe I had even wrapped it and was ready to take it to Abby. So I had to unwrap the gift and have a "do-over". ")
Iris Bed

Irises
 I love these white irises trimmed in purple. They just seem to light up my iris bed. The stalks have been extra long this year sporting 5-6 blooms. They have made wonderful bouquets in my vases.
 This delicate pink iris has tiny pink flecks in the falls. They are hard to see in this photo, but if I enlarged it, the photo actually became very blurry. I think they are such a great addition to an iris bouquet.
 This little beauty is such a striking bloom. I think the light lavendar tops really set of the darker lavendar falls. Stunning, isn't it? ")
Thursday, April 12, 2012
ATCs: DTP, Watercolors and Paper Punches
 The paper on the right side of this ATC has been done with the DPT approach (Direct to Paper). Just take the inkpad and put it directly onto the paper and swipe, smear, or pat it on. I used several shades of plum for this piece done on glossy cardstock. When dry, cut it up to use on cards, journals or ATCs. ") I tore a piece of decorative cardstock that had row after row of the fluer-de-lis. I edged around the narrow piece with a brown inkpad and then attached it to the glossy cardstock ATC. Next I stamped the birdhouse using a black inkpad. I stamped the three birds with turquoise onto a beige scrap of paper and cut them out. I attached the top and bottom bird with dimensional tape and glued the remaining bird directly to the ATC. I stamped the egg with a varigated pigment ink on glossy cardstock and used the heat gun to dry it quickly. I cut it out and attached it in the lower right corner and attached the "Par Avion" across the egg. I cut out the Paris faux postage and attached it to the top of the ATC. (This was traded in a personal trade.)
 I love this striped paper! It is the reverse side of one of the papers in graphic45's Curtain Call collection. I thought it perfect to use this wine cap. The colorful paper is light weight watercolor paper that I used to try out some new watercolors. I tore off a piece of it and stamped the pear image onto it with a black inkpad. I attached the watercolor paper onto the bottom half of the ATC and attached the flattened wine cap
 I wanted to do a card with "windows" and decided to use my 1" round paper punch on this ATC. I love these little flower fairies and know the recipient does too, so I punched one window to show her face and another to show the flowers at the end of the bouquet she was carrying. My friend lives in the North and we had been emailing about longing for Spring, thus the sentiment
Building ATCs
 This is the ATC I made for our art club swap in January. I used a clothing tag as my base. I cut out the starburst that was in the center of the circle on the tag. I chose this face from graphic45's Curtain Call collection to show through the opening. The little tag at the top left of the circle is from 7gypsies. I edged it with red ink and attached it to the tag with red eyelets. The image on the little tag is from a photo I took in the Metro in Paris this past Sept. I used a thumb nail print and cut it in half to attach it to the tag. Next I placed the flower next to the circle and attached it with a rhinestone brad. I used Cavallini's number tape to go down the side od the tag and added "Cirque" to the name on the tag. (This tag went to my dear friend Sara.)
 This tag has images from one of Sandy Gordon's art sheets that can be purchased and downloaded from her web site. I love these strolling ladies and imagined they were from MA's era. I placed a Paris postmark in front of the leading stroller and then attached the second lady in the foreground to add dimension to the ATC. I entitled this one "Strolling through Paris". (This one went to Jean, a dear lady that I have been trading with for years...........we met online in one of her ATC trades.)
 This is my ATC for a personal trade that I have done for years with a very close and dear friend, Judi. It was February and time for a little Valentine. ") I used the image of the little girl from the stamp collection "Polaroid Cutie". I cut around the image in a heart shape. I placed a strip of watercolor paper that I had used some metalic paints on along the left edge of the ATC and a piece of script paper on the right side. I attached the heart to the ATC and added the XO sticker in the upper right corner. I took apart a heart earring and added the open metalwork heart next the the image. Next I outlined a ticket with a red marker and cut a rectangle from the center so I could put a word ticket behine the slit. I mounted the tickets together with dimensional tape. I added red rhinestones to the ticket and attached it to the bottom of the ATC as shown. Next I stamped a small red heart in the bottom right corner. Finally I added some clear rhinestones to the ATC.
Friday, April 6, 2012

 Some times the scrapbooking paper might even have a hidden image in it like the horse on the dark pink ard on the left. Even a piece of film strip and a puzzle piece make good embellishments on them.
 These cards are gifts for the ladies that I meet with every Tuesday morning for Bible study. It's a surprise, so don't tell! ")
More and more tiny notes.........................
 I feel like I'm not being wasteful if I use up all my scraps making these cards. I use 2"X4" strips for the card and then find images or stamp images to go onto the fronts. You really have to think "tiny" when gathering everything to make them. I have a small round basket that I put items in and keep it close by while making cards. I hardly ever throw out small pieces of papers that I paint, ink and doodle on because they are just the thing to dress up a tiny note. (The card with the copper edging has a strip of watercolor paper that was a scrap from some paper I made using my watercolor paints.......and usually the cheaper the paint the better because you can throw caution to the wind and not be afraid to use lots of color.........for only pennies!)
 I love the sheets of scrapbook paper that have lots of images on them such as "graphic45" and "7gypsies". Also Art Chix have many, many collage sheets that are handy to have for making the tiny notes.
See what I've been doing............
 There are 144 Tiny Notes in this pile of cards. These were first published in Stampington's Autumn 2008 issue of Take Ten and then again in their Volume 7 issue of Hand Crafted. I love to make these tiny notes as gifts for friends because we all have that moment when we're rushing out to a birthday party or shower and realize we didn't pick up a card. These little darlings are so easy to sign and throw into the gift bag or to tie onto a package.
 I use various sentiments on the tiny notes in order to
 include as many events as I can. Here you see the "be happy" card in center bottom which could be used for a wedding gift. The pastel card at the top center of the pile with the blue chipboard button that has a white flower on it would be perfect for a baby shower. Some of the sentiments I computer generate and I have rubber stamps for others.
Thursday, April 5, 2012
More to come.................promise!
Wow! I see it's been a while since I posted anything. It is my goal to get back this month. I have been very busy with lots of great projects in our art club. Also lots of activity in the family, ie. birthdays, babysitting, and sickness. So, I'm getting things organized to get back into the swing of things. ")
Subscribe to:
Comments (Atom)