Total Pageviews

Thursday, December 23, 2010

Graphic45 tag...........

I used some more of the Graphic45 double-sided cardstock for this tag.  It measures approx. 6"X3".  I rounded the corners on this tag.  First I painted this tag with Studio Landscape Green.  When it dried, I painted over it with white gesso and added some clear Stickles before it dried.   Next I painted over those layers with Ranger's antique Crackle.  When it dried, I rubbed Ranger's photo Distress inkpad over the crackle effect until I had it down into the cracks.   I tore a 1" strip of the same cardstock and edged it with brown ink before adhering it to the tag near the bottom.  Next I used two Storybook labels cut with the Cricut and layered them together with tiny star brads.  I wrote the "to/from" with a fine-point Sharpie; then, I glued them to the bottom of the tag as shown.  I used some of the Graphic45 Christmas postalz cut from a sheet of their cardstock.  I ran these through my small Xyron sticker-maker and stuck them on the tag.  I used a strip of stick-on red star gems to the left side of the tag and randomly placed green gems around the tag.   I tied a red ribbon on this tag.

Red Joy tag.....

I love the texture on this red cardstock..........and it is such a pretty red.  ")   This tag measures approx. 2"X4".  I stamped the "Joy" with gold ink and edged all around the tag with a gold-leafing pen.  I used a fine-point Sharpie to write the "to/from".    Next I wrapped a 1/2" piece of white twill around the tag below the writing and secured it with a gold enamel Bo Bunny brad.  I also used a gold square brad at the top of the tag.  I placed a Bo Bunny rubon below the white twill.  I tied the top of the tag with white sheer ribbon.

Santa tag

This tag measures aboout 3"X6".  I love combining my rubberstamps in all my art.  Here I have stamped a Santa face directly on the tag and colored them in with Copic markers.  I have used a double-sided cardstock (which I use in most of my paper arts) on this tag.  I tore a piece about 3"X3" and used the reverse side.  Then I edged around the piece with brown ink.  I angled this piece a little upwards and secured it to the tag, hiding a bit of Santa under it.   Next I used some Bo Bunny rubons for the top and bottom of the tag.  Then I stamped the sentiment in green ink at the bottom of the tag.  I edged the tag all around with brown ink and added the gold  paper trim to the right side of the tag.  I tied a green ribbon through the top of the tag.

Musical notes tag.....

This is the smallest tag I made, but I think it is the sweetest.  It measures 2 1/2"X2 1/2".  This one was actually cut on the Cricketcut.  I tore a piece of red cardstock about 1" wide and edged it in brown ink.  I then tore a piece of music cardstock about 1/2" wide and edged it with the brown ink.  I adhered the music paper to the center of the red paper.  Then, I used tiny star brads and placed them directly over some of the music notes.  I adhered this piece to the tag and edged all around the tag with brown ink.  I used a Sharpie to write "To:/From" and added the red ribbon through the hole at the top.

Christmas Tags

Here are some of my Christmas tags.  I actually taught a class the first of the month using these tags as my examples.  I used about three times this number before I got all my gifts wrapped; but, that included the stocking stuffers, too.  ")   I love making tags for any occasion. 

Monday, December 20, 2010

Christmas Birds for Minori


Christmas Birds for Minori, originally uploaded by inkybru.

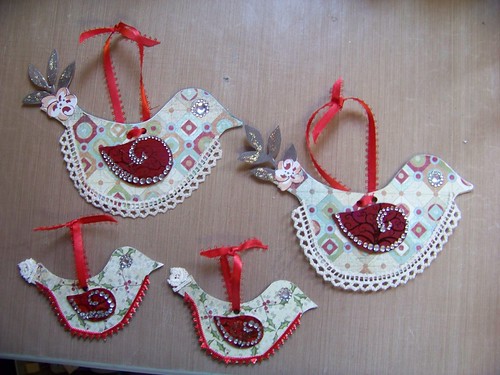
I made these for a friend for Christmas and have decided to make some or myself. Hmmm, that gives me 4 days to get them done! ") Nothing like waiting until the last minute, huh. LOL I'm sure it will be after Christmas before I get anything else posted. Merry Christmas! and a Happy New Year!

Sharla's table at Thanksgiving.............

This was our Thanksgiving table at Sharla and Chris's home.  (Chris is the one that folded the napkins.)  I'll post one after Christmas of their tree and all our family in their home for Christmas Eve when we exchange gifts.

Thursday, December 16, 2010

MERRY CHRISTMAS!!!!!!

This is my Christmas card to everyone who comes to my blog.  Merry Christmas!  I do hope you know the true meaning of Christmas ...............and whose's birthday it is.  ")    My favorite Christmas hymn is:  "O Come, O Come, Emanuel!"   And, Emanuel means:  God with us.  When that babe was born in Bethlehem over 2000 years ago, it was the beginning of "God with us" in a way that the human existence had never known.  Today we can have that experience in a very personal way:  believe on the Lord Jesus Christ.   I pray you all will have a Very Merry Christmas as you experience the love and joy of being with your family and friends.  And, heres to a better New Year for all of us!   My love to you all, sharon/inkybru of inkybruSTUDIO

Published in Stampers' Sampler Dec/Jan2011 issue

This is the cover of the Stampers' Sampler that I was published in for Dec/Jan 2011.   Andrea Ockey Parr from Farmington, Utah, had her Tempting Template submission put on the cover.  Congratulations! to you, Andrea.  It is a lovely card........love the colors!....and the image is so precious!  (the bird is from Inque Boutique and the elf/sentiment is from Stampin' Up!)   This is one of the prettiest cards I have seen in quite a while.  Lots of good stuff in this issue.................if you can still find one, buy it!
This is the other card on the next page.  It is a Get Well card.......I don't know why they didn't pull it up enough to show the sentiment.  This is some more of the SEI paper..........love the coordinating papers in the pack.  ")   I used a pink corrugated strip across the top of the card to mount the flower on and drew the leaves and colored them in with a metallic watercolor pen.  Also used lime green corrugated piece behind the flower on the ribbon.
This is a view of the inside of the envelope, too.
The swirl stamp is by Rhonna Farrar of Autumn Leaves (?).........    The photos of the cards out of the envelopes were taken before I sent these submission to Stampington.  I try very hard to remember to photograph everything I send as a submission because I very rarely have them returned...........cards, that is.  If I send in a book or a journal, I send postage money so it can be returned to me. 
This little card was on the next page.  I love this little girl image .......another B-Line Design stamp.
I stamped her 2X and cut the dress out of the decorative paper and layered it over the little girl image.  She just looks like she might be missing someone.  ")   Sentiments are by Stampin' Up!
This paper is by SEI (Mimosa) and the page that has the little flowers on it is just loaded with them.  They are perfect to cut out and layer..and snip so you can curl them up and make them look three dimensional.
Three cards on one page!  Stamps on this page were B-Line Designs (Beverly Seymore) and Stampin' Up!  I just loved the image of the man and woman kissing and they were dressed in black and white.  So, I thought "Wedding!  The embossed white paper I used for the ribbon around the envelope on this one is a piece I had been saving of ages...........and it was just perfect for a wedding congrats! 

The Birthday Girl is one of my favorite images from B-Line.  The envelope is a flocked cardstock.

The paper I used for "family reunion" is from Scenic Route......
alas, it is no more :(..........I bought several of Sarah Milne's craft papers that have a design running up the left side of the papers.  This one had a tree and just begged for those little birds of Beverly's to be stamped onto it.  ")    I used one of Allie Gower's "Metal Works" flowers for the center of the ribbon.............and they didn't even give her credit for it!!!  I've
sent in several cards to Stampington with her Metal Works on them and this was the first they've published.  (sorry, Allie :( 
I think this is my favorite card that I made for this challenge.  (Catherine Moore stamps, of course!
I stamped the lady three times to get skin tone, the dress and the bowtie; then, I cut the dress and tie and layered over the skin tone image.  I used Copic markers to color in the hair and face features.  And, then stamped the tea tray from the same papers as the dress and used it to embellish the paper ribbon around the envelope.  (These are my very favorite colors!)